Showing posts with label easy. Show all posts

Monday, June 17, 2013

Surprising Summer Salad: Watermelon and Feta!


Trust me, this sounded weird to me too. Watermelon and feta?! Really?! I had never had watermelon in any kind of savory context. Having both ingredients in the fridge, I decided to experiment. Why the hell not?


An unexpected combination results in a refreshing and totally delicious salad!

The result was way beyond expectations -- absolutely delicious. Refreshing. New. Incredible. The salty and creamy crumbly feta brought out the sweetness of the watermelon in new ways. I added a few mint leaves from my little window garden and a drizzle of olive oil and voila -- added layers of complexity and flavor in what is definitely going to become one of my summer staples.

I came back from work feeling hot and tired the other day and just made a new batch in minutes, scooping chunks of watermelon with a spoon straight into the bowl, crumbling the feta over it with my hands and adding the mint leaves and olive oil. I also tried a bit of balsamic vinegar the second time and that tastes wonderful too -- I can't wait to try a bit of lemon juice... I had a quick, healthy and refreshing snack in no-time and it felt so sophisticated too! 

I hope to play around with this recipe some more this summer, as the possibilities seem endless...

Monday, May 13, 2013

Gourmet Salad with Mango

This is my first salad creation of the summer, and a follow-up on my post about the 5 rules for making a full meal of your salad!

My salad consists of some lettuce from my very own roof-top veggie garden, and the usual culprits: ripe tomatoes and carrots. But the extra protein and fruit I added are what really made it special!


Color:
The bright summer colors did a lot to make this salad visually appealing and beautiful!


Protein:
I added a mix of walnuts and almonds as my protein #1, and cubes of feta cheese as protein #2.

Fruit:
I added juicy, ripe mango as my fruit -- it added an unexpected sweetness to this savory salad and balanced out the salty feta cheese really well!

Texture:
Crispy fresh lettuce, juicy soft mango, the crunch of the nuts and the dry crumbliness of the feta made for a great variety of textures that kept this salad interesting and exciting!

Homemade Dressing:
I made a simple oil and vinegar dressing for this salad, but the key was using balsamic vinegar. This type of vinegar has a natural sweetness that went really well with the mango flavors and really enriched the salad!


This colorful salad had enough variety to make for a full meal, and the protein kept me sated even though it was all relatively light.

Let me know if you have experimented with any delicious salad combos of your own! Post comments and recipe suggestions in below and I will be sure to follow up. Happy eating!

Saturday, May 11, 2013

5 Rules for Making a Full Meal of Your Salad

The season of long days and steamy nights is inching nearer, and with atmospheric CO2 levels at a 3-million-year high, I suspect it'll be a hot one! Nothing better than a light, refreshing salad to keep you cool as a cucumber, and able to show off your sexy summer body guilt-free. But often, eating a salad sounds boring and you end up having the same old lettuce-tomato-carrot combo that leaves you dreaming of those sexy gourmet salads at your favorite bistro or restaurant...

Fear not! Your days of boring salads are over if you just follow these 5 simple rules that allow you to mix and match to create your own gourmet dish from both fresh ingredients and things that may be lying around in your pantry or refrigerator. Your favorite salad can go from midsummer night's dream to reality in minutes!

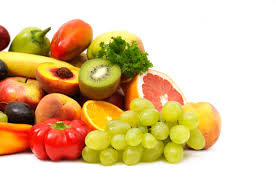
Begin with your favorite base of greens and veggies, whatever is in season and looks beautiful in the market stalls. Summer is a great time for tomatoes, peppers, and all sorts of colorful produce -- be adventurous! Once you have your favorite veggies together, time to take it to the next level!

RULE #1: PLAY WITH COLOR


Make your salad visually appealing by making sure to mix and match different colors on your plate. This will also ensure that you hit upon different nutrients and minerals in your dish, something really important if you are trying to make a meal of it. Dark and light greens, plump ripe tomatoes in red, yellow and orange, crunchy carrots, bell peppers of different colors, the purple pink of red onions, black olives, etc. -- make it a rainbow and try to get at least 5 different colors in your bowl!

RULE #2: ADD SOME PROTEIN

Play with different protein combos for the variety of textures they add -- more on this later!

Protein will keep you full for longer and adds an important nutritional component to any salad. Different protein types to choose from include:

Seeds and Nuts:

  • Almonds
  • Walnuts
  • Sunflower seeds, etc.


Dairy/Cheeses:

  • Feta
  • Brie
  • Parmesan
  • Plain/Greek yoghurt


Meat or Meat Substitutes:

  • Smoked Salmon, Turkey Breast, Ham etc.
  • Grilled Chicken or Steak
  • Boiled Egg
  • Tofu


Protein-Rich Grains:

  • Beans/Lentils
  • Quinoa etc.


As a general rule, try to include at least one ingredient from any 2 of these protein groups to make your salad rich in nutrients and vary the kinds of protein you are eating!


RULE #3: ADD A FRUIT!

Go beyond what you imagine is acceptable in a salad -- you won't regret it!

This is a secret that can really separate a gourmet salad from a plain one -- a little bit of fruit! Of course I am not counting tomatoes here, since we are used to eating them savory. So think beyond tomatoes and the usual raisins/Craisins, avocado (though I love avocado) and apples/pears. Summer is full of bright colorful fruits that will add a truly delicate touch to your salad, and a burst of color/flavor. Try to get creative with berries (like strawberries or blueberries), citrus fruits like grapefruit and oranges, and summer fruits like grapes, mango or peach! Since they can be pretty intense, I would not recommend adding more than 1 fruit flavor to your salad.

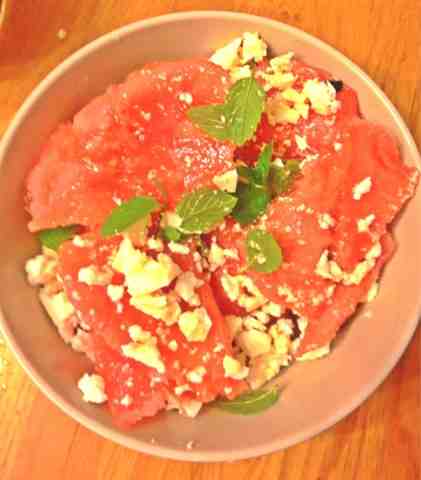
RULE #4: PLAY WITH TEXTURE

Beyond the visual appeal of a colorful salad, think about combining different textures to create something that appeals to your sense of touch as well! Combine a soft, juicy fruit like mango with dry crunchy nuts, or a crumbly cheese like feta with the satisfying pop of blueberries or grapes to create interesting sensory experiences with your food!

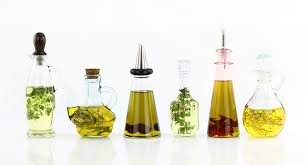
RULE #5: MAKE YOUR OWN DRESSING

For the healthiest and most flavorful salad dressings, nothing is a good substitute for plain old salt, pepper (to taste) and extra virgin olive oil. The stuff you buy in the store is filled with bad oils (even when it says it's made with olive oil, read the ingredients!! I don't know who allows manufacturers to lie on these bottles!) and emulsifiers that keep the ingredients from separating.

For the most part, I personally am a fan of plain old olive oil and vinegar. Sometimes, a bit of mustard or yoghurt is more than enough flavor for my salads. But if you are still adjusting your palatte to the taste of veggies on their own, some of these extras might help.

Beyond these basic ingredients, you simply need to add an acid and any other things you love. Here are some ideas:

Acids:

  • A vinegar (balsamic, apple cider, red/white wine all work -- experiment, and try to match it to your salad!)
  • Lime or lemon juice (freshly squeezed over your salad for the lightest and most refreshing flavors!)


Something creamy:

  • A bit of mustard (dijon is delicate and delicious if your salad has meat in it!)
  • A dollop of yoghurt (my preferred mayo substitute, it is healthier and very flavorful!)


Extra Flavor:

  • Minced garlic (can be great on more intense/spicy salads)
  • Fresh or dry chilli peppers (I'm thinking of Thai papaya salad!)
  • Anchovies or olives for the extra intense saltiness
  • Honey (a tiny bit can go into creating your own honey-mustard variations)
  • Fresh herbs like cilantro, mint, fennel, etc. can add a punch of fresh flavor!


Get creative with your own healthy dressings!

Now that you know these basic rules, experiment and mix it up to create the most amazing salads this summer! I will be posting some of my own creations throughout the season -- stay posted!


Thursday, May 9, 2013

Roasted Veggies Day 3: veggies with a side of rice

A quickie -- I did not much time to prep or think of a proper meal this morning, so I just served the veggies with a side of rice snug into my Bento box and ready to take to work! My husband had conveniently cooked some extra rice the evening before, so it was waiting for me in the fridge in the morning.

My Bento Box, packed and ready for lunch!

It was a nice, light lunch and heated in the microwave, with a little drizzle of olive oil, made for a delicious way to get me through the day!

Tuesday, May 7, 2013

Roasted Veggies Day 2: Arugula salad with roasted veggies and nuts

This is a hearty salad that can definitely make up the main course for a light evening meal during the week!

I simply washed some fresh arugula and served some of my roasted veggies over it, adding some walnuts for the crunchy texture and for the protein. I tossed it in a little olive oil and vinegar, since the veggies are already flavored and salted. With a slice of good, whole-grain bread as a side, I went to bed very content!


This easy salad can be ready in minutes once you have your veggies ready!

Monday, May 6, 2013

Roasted Veggies Day 1: Mediterranean Pita Sandwich

Simple, delicious and healthy!

For lunch today I packed my little bento box with some of my roasted veggies and a side of my homemade Greek yoghurt. I brought some pita bread to work and, voila, a delicious, mouth-watering, tasty, happy-dance worthy meal in under 3 minutes.

A gourmet meal in minutes!
I didn't even warm up the veggies since I don't mind them cold, though that would be an options. I simply warmed up the pita in a toaster oven, opened it up and spread the yoghurt onto the bread with a knife, and added a drizzle of olive oil before putting in the veggies -- divine!

For good, affordable yoghurt in Shanghai, visit the Avocado Lady or learn to make your own by reading one of my earlier posts, here.

If you missed my post about prepping roasted veggies in advance, read it here.


Wednesday, March 6, 2013

Steamed Veggies for a Week of Healthy Eating

I spent a few hours on the weekend chopping, washing and steaming a bunch of veggies, including squash, onions, garlic, spinach, cauliflower and broccoli. I also made a good portion of whole rice mixed with barley to keep in my fridge, and defrosted some black beans i had cooked a while back. I have talked before about how my busy schedule makes it hard for me to cook during the week, and I have found that washing and cooking the veggies in advance helps me eat home cooked meals throughout the week!

Reimagining the veggies and creating dishes with them later in the week is fast and easy! A bit of vegetable broth and I have soup, a few spices and I have curry, a blender and I have a dip or purée to eat with chips or pita...

This pic is of the veggies eaten pretty much straight up, with some salt, a squeeze of fresh lemon juice and some olive oil! Yum!


Friday, January 18, 2013

Pauper's Dinner

Came home from yoga absolutely ravenous and knowing full well there was no food at home and I was in no mood for cooking any...

I opened the fridge and found some leftover sautéed spinach! Spread it cold on some toast and poached and egg and voila! Pauper's dinner, light enough for a late, post yoga eat, delicious and only took like 3min to make!


Saturday, September 15, 2012

Super Seafood Tray Bake!

Last night I had friends over for dinner in my new place for the first time and broke my own rule about not making something I've never made before when I have guests over... I broke the rule because:
  • I have been dying to try this recipe from Jamie Oliver's app.
  • It looked pretty fool-proof.
  • I wanted to do something in the oven so we could chat and hang out while the food was getting ready (best way to eat with guests!)


Photo courtesy of Jamie's app since I totally forgot to take pics until we had devoured almost EVERYTHING!
I did not regret the decision! This dish was flavorful but light, ideal for a late evening meal. it was citrusy and minty, and the smell of the fresh parsley stalks as I cut them reminded me of my childhood for some strange reason I could not quite place...

It was the first time I bought fresh seafood at the wet market! It's weird but all the live fish have intimidated me for a LONG time and it was fun to finally overcome my squeamishness. But more than that I haven't really cooked with seafood very often before either, except for the odd grilled salmon dish or shrimp stir-fry, so it was nice to have this recipe to guide me!

The main ingredients were seafood (Jamie says any kind will do, and his recipe called for jumbo shrimp, shells off but tails still on, and scallops. I added squid to mine on top of that!) and tomatoes. Jamie says a variety of tomatoes, adding up to 1lb (around 450 grams) for 4 people, but it is hard to get much variety in tomatoes here in Shanghai. I ended up using some red cherry tomatoes, some orange cherry tomatoes and a large tomato on the vine. The carb that gave some sustenance to the dish was couscous, and it was light and flavorful!

Ingredients: (for 4 people)
  • 8 sea scallops (getting these was hilarious; in the end I had to ask the guy at the market to please kill them for me!)
  • 12 extra-large shrimp, shell off, tails on (it was a struggle with the lady at the market over this too! She insisted the heads were delicious, along with the "yellow stuff" inside them, and really wanted me to keep them!)
  • 1 1/2 cups couscous
  • 1lb mixed ripe tomatoes
  • 1 cup jarred roasted peppers
  • 3+1 cloves garlic
  • 3 cups arugula
  • 4 spring onions (Jamie calls them scallions. Also, the ones in China are tiny compared to the ones in Jamie's photos, so I used more than 4.)
  • 3 lemons
  • 1 bunch fresh Italian parsley (I have no idea what is meant by "Italian" parsley... I just used parsley!)
  • 2 tbsp fennel seeds
  • 6 sprigs fresh cilantro
  • 6 sprigs fresh mint
  • olive oil
  • sea salt
  • black pepper


How To:
  • Preheat the oven to 400 degrees Fahrenheit/200 degrees Celsius.
  • Quarter the large tomato and halve the cherry tomatoes, leaving the very small ones whole. Put them in a big mixing bowl. Then add the roasted red peppers (from a jar), roughly chopped.
  • Slice up the spring onions finely, and add to the bowl of tomatoes with the juice of one lemon. Add some salt and pepper to taste.
  • Pick the leaves off the parsley and separata them out for later; chop the parsley stems up finely (this is the smell that reminded me of my childhood!)
  • Peel and finely slice the garlic cloves; pound the fennel seeds with a pestle and mortar. 


ASIDE:
I am such a disorganized cook! I pounded the stupid fennel seeds and then totally forgot to add them to my dish later on! Haha! I wonder how different it would have been...

  • Bring some water to a boil in a saucepan or kettle, and meanwhile heat some olive oil in a frying pan and add the garlic, parsley and fennel seeds (I FORGOT THE FENNEL SEEDS!). Stir and fry until the garlic is golden, then add the dry couscous and stir so it gets coated evenly in the oil. 
  • Add 1 and 1/3 cups of boiling water to the couscous and stir until all the water has been absorbed.
  • Tip the couscous into the roasting pan and spread it out to make an even layer.
  • Add the shrimp, scallops, and any other seafood (in my case, squid!) to the bowl of tomatoes, add some olive oil and toss to coat everything evenly. Then spread this somewhat evenly over the couscous.
  • Drizzle everything with olive oil, add some salt and pepper, cover with aluminum foil and stick it in the hot oven!
  • Cook for 30-40min (I left mine in a little longer, around 45, and it was fine!)
  • While it's doing its thing, pick the leaves from the mint and cilantro, add to the parsley leaves and mince it all up really finely with the zest of one lemon and a clove of garlic.
  • Wash and dry the arugula.
  • Squeeze the juice of the zested lemon into a glass jar, add twice as much olive oil and some salt and pepper, cover the jar and shake. Use this to dress the arugula once dinner is ready to serve!
  • Serve scattered with the chopped herbs, a squeeze of lemon juice and a side of lemony arugula. This dish was a huge success!
To be honest, the only problem is that we all might have eaten a little more if there was any left!

Note: Avocado Lady has the couscous, lemons, mint, parsley, arugula, and other foreign ingredients necessary for this dish! I bought the jar of roasted bell peppers at City Shop on Nanjing Rd.

Sunday, September 9, 2012

Roasted Bell Peppers (the stuffed of legend!)

My dinner tonight was divine if I should say so myself...

I have made stuffed bell peppers myself before, mostly intuitively, putting in them rice, veggies, and anything else I found lying around. But tonight was different. Against my better judgment, I followed a recipe by Jamie Oliver after downloading his app, Jamie's Recipes for the iPhone. Now, I say against my better judgment not because I do not like Jamie Oliver but because I do not like recipes, nor do I ever really follow them. But I decided to download Jamie's app because it has good reviews, I have seen and enjoyed hi TV shows, and his app has a whole recipe package for tray bakes, my favorite way of cooking!

The finished product looked colorful and was absolutely delicious!
I love tray bakes because, in Jamie's words, "it's basically just an assembly job." Yes, I enjoy throwing things together and then just allowing the oven to do its thing while I do my thing. That's what cooking reluctantly is all about!

So anyways, the point is, Jamie's recipe was pretty mind-blowing. It was absolutely DELICIOUS and I  kind of felt sad that no one was around to share it with me, but happy it worked out and I can maybe impress some friends with this sometime. I don't usually cook for others when I am trying to make something for the first time... takes the pressure off ;)

These were the ingredients:

  • 1 Red Bell Pepper
  • 1 Yellow Bell Pepper
  • 1 Ripe Tomato
  • 1 Eggplant (Jamie's recipe said 1/2 but Chinese eggplants are so small... plus, what the hell am I going to do with half an eggplant in my fridge?!)
  • 1 Red Onion
  • 1/2 Head of Garlic
  • Fresh Parsley, Mint and Thyme
  • Lemon
  • 1/2 Tablespoon Coriander seeds
  • Kalamata Olives (I just used regular black olives in mine)
  • Sun-dried tomatos
  • 100g. (about 4 oz.) Feta Cheese
  • Pine Nuts
  • 1/3 cup of couscous
  • 1/2 cup of chicken broth (Jamie says vegetable, but I was out!)
  • Salt & Pepper to Taste
  • Olive Oil 


Beautiful, fresh ingredients just for me :)

  1. I chopped up the zucchini and eggplant into bite-sized pieces. I quartered the tomato and peeled half of the onion, cutting it into wedges. I put all these ingredients straight onto the roasting pan.
  2. I picked the thyme leaves off the stems and discarded the stems. Then I ground up the coriander seeds using the mortar and pestle, separated the garlic cloves from each other, leaving the skins on, and setting 2 of the garlic cloves aside for later. I added the thyme, coriander and garlic cloves to the veggies on the roasting pan, added some salt, pepper, and a few glugs of olive oil and mixed everything up so the veggies were all evenly coated. I set this aside.
  3. I preheated the oven to around 200 degrees Celsius (400 Fahrenheit). Meanwhile, I put the pine nuts in a non-stick frying pan over medium heat and moved them around until they were a nice golden brown (just a couple minutes).
  4. I heated up the chicken broth in a saucepan and added it to the couscous in a large mixing bowl, which I then covered with a lid. While the couscous was doing its thing...
  5. I minced the remaining half of the onion really fine and sautéed it in olive oil over very low heat, allowing it to get really soft but not brown. While it was heating up I minced the remaining 2 garlic cloves and added those in too. 
  6. When the onion and garlic were done, I chopped up the olives and sun-dried tomatoes, picked the leaves off of the parsley and mint stems and chopped them up finely. Then I added the onion, garlic, olives, sun-dried tomatoes, pine nuts, parsley, mint, and the crumbled feta cheese, to the couscous. I mixed everything up with a fork and seasoned with juice of half the lemon, some lemon zest, salt and pepper.
  7. I cut the bell peppers in half lengthwise and removed the seeds and the white foamy bits on the inside with a spoon (mostly my fingers to be honest.) Then I stuffed them with the couscous mixture and lay them over the veggies on the roasting pan. I wrapped everything in aluminum foil and put it in the oven!
  8. It was in the oven for about 45min and then I removed the foil and allowed it to cook for another 20min. uncovered.
  9. My house was filled with the most divine, citrusy-peppery-feta-cheesy smell EVER as I took the time to wash up the dishes and watch some TV...


This experience has taught me a few things:

  • Pine nuts are amazing little things. I have not often cooked with them, except in the odd pesto sauce when I am feeling inspired (which is not often), but these little guys were an AMAZING complement to this dish. Their nuttiness was a great addition to the flavor but, more importantly, their texture did wonders for this dish, which can be a little mushy otherwise! If I ever make stuffed bell peppers again, even if I am not following this recipe, I will try to add some kind of nut to the dish, for the crunch :)
  • I have totally undervalued thyme in my cooking. This zesty, lemony little herb deserves more of my attention! I will try to get some for my herb garden, so I use it more often.
  • If there was one thing that could be improved, it was the fact that a lot of water was left in the veggies... I like my roasted veggies a bit dryer, so I would uncover them a little earlier next time, to dry the dish out a bit more.
  • More roasted garlic in my life, please! The soft, white garlic, slipping out of its silky skin with the slightest pressure from a knife or fork, YUM! I hadn't added this to my roasted veggies in way too long and it's time to bring it back!
  • I remember the value of recipes! Even if I don't follow this to the letter ever again, I learned a lot about combining some of these mediterranean flavors and ingredients, and feel more confident I can make something awesome on my own next time ;)


Hmmm... my plate was full and now it's empty :D

Thursday, September 6, 2012

Basil's got Back!

I trimmed my basil back a few weeks ago only to find that it bounced right back and was starting to get really tall again!


I also noticed that as the plant was getting taller, some of the leaves were losing their dark green color and fragrance as the plant was spending a lot of its energy growing upwards. The stems were also getting thicker and the leaves fewer and more far between!

Slightly out of focus, I know... but you can still see the green, right? This photo does not do justice to just how awesome this SMELLED!

I intervened with a pretty dramatic trimming and made this delicious basil pesto that I just had to eat immediately with fusilli and a glass of Italian wine!

I had about 4 cups of basil leaves and added a pinch of salt, a clove of garlic, and a good amount of olive oil and just put it all in the food processor. Once it was done I added about 1/4 cup of grated Parmesan cheese and served it over pasta. So good!

Fusilli :D

I am hoping after the big trim that I can get another basil harvest before the cold sets in. I'm also going to try to see if my basil plant can survive the winter in a hold Chinese apartment... Any tips would be greatly appreciated!

Monday, September 3, 2012

Luscious Labneh (aka Yogurt Cheese)

Labneh is one of my favorite things in the world. The addiction started at the end of high school, when I dated a Lebanese boy whose family always had this at home. When I headed to college, our relationship ended but Labneh has stayed with me.
I like mine with some ground black pepper and drizzled with olive oil!

My labneh has been a huge hit at parties and events as a dip, served with good bread and crackers, drizzled with olive oil. If you are feeling ambitious, you can pretty it up with olives, dried fruit, nuts and fresh herbs.

This delicious and easy to make "cheese" is really just plain yoghurt that has been strained of its watery part to make it thicker. How long you strain for determines the consistency, and it is totally up to you how solid you want it.

Obviously then, the first challenge is obtaining good plain yoghurt. If you live in the US this is easy since there are billions of brands to choose from, depending on your price range and preference for free range, organic, etc. cows. If you live in China you might be better off making your own yoghurt like I do (refer to earlier post for how to do this!)

Instructions:

Mix about 1 teaspoon of salt into 1 liter (around 4 cups or 32 fluid ounces) of plain yoghurt (this is optional and I often skip it and just add some salt when I want to eat the cheese. If you just want a thicker consistency, e.g. Greek Yoghurt, you won't want to add salt!)

Take a large colander and cover it in a cheese cloth or other appropriate cotton cloth. My Lebanese friends taught me that you don't really need to buy "cheese cloth" per say; as long as the cotton is clean and not too loosely woven, even a pillowcase will do!

Colander

Colander covered in cotton cloth, in large bowl.

Place the covered colander inside a large bowl, where the watery part of the yoghurt can drain into. Try to make the cloth a little taut, so it is not sagging into the colander. This will help the yoghurt to drain. You can do this by tying a string or elastic band around the cloth and colander.

Pour your yoghurt into the cloth, and cover. You can improvise with a lid like I did, or just use plastic wrap.

Yoghurt in cloth, before draining

I have a little saucepan whose lid works well for this!

Place it in the fridge and allow the yoghurt to drain for a few hours. I usually leave mine overnight for around 10-12 hours, which makes it about as thick as cream cheese, though much lighter and easier to spread.

If you leave it for just a few hours, maybe 2-4, you will have a thick (Greek-style) yoghurt that you can use in dips, etc.

If you need to keep it longer than 4-5 days, let it drain longer (around 24 hours) so it is thick enough to be rolled up into little balls. Then you can put those in a jar and cover in olive oil. (I never do this since I go through mine way too fast!)

My labneh, ready to enjoy!


Saturday, September 1, 2012

Simple Steamed Broccoli

This is super simple, but for people who don't like veggies unless they are either fried or smothered in cheese/cream/oil/mayo or something else of that sort, this simple dish is how I converted my little sister, back in the day.

Green Goodness!


Broccoli is so delicious all by itself that there is no need for much else. The biggest broccoli crime is overcooking, so here's how to get delicious broccoli that is cooked just right and still looks green and retains some crispness:


  1. Wash and cut up the broccoli so that you preserve the natural florets. 
  2. Wash and chop the broccoli stems, too, even the big thick one! So many of the vitamins are in the stem and I swear I am being honest when I say it might be my favorite part of the broccoli -- it is crunchy, flavorful and just awesome.
  3. The thick stem and some of the bigger florets can be quickly peeled. Removing this thick outer layer makes the stems less fibrous and tough, and you will enjoy them a lot more.
  4. In a small pot or saucepan, put about one centimeter (approx. half an inch) of water, a teaspoon of salt, about one tablespoon of olive oil and some minced garlic (about 1-2 cloves should be enough). Add red pepper flakes if desired, and bring to a rolling boil (since there's not much water, this should not take long!)
  5. Once the water is boiling, add the broccoli and cover tightly. The broccoli will not be covered by water; it will be steamed and absorb the flavors of the good stuff you put in there.
  6. The broccoli will be DONE in 3-5min -- do NOT overcook it! 3min is pretty crunchy, 5min is more well-cooked but still a bright green with some crunch ;)


This should be delicious on it's own, or you can add a bit of olive oil and/or some soy sauce, depending how you want to enjoy it.

This will keep for a few days in the fridge and can be eaten cold, used in salads, etc.

I swear this simple recipe is delicious, healthy, and a great way to get reluctant veggie eaters converted ;)


Friday, August 31, 2012

Dry-Fried Sichuanese Green Beans! (干煸四季豆)

I learned how to make one of my favorite Chinese dishes the other day, at a team-building event I helped organize for work. Some of my co-workers and I joined Chef Mike at the Chinese Cooking Workshop here in Shanghai and tried our hands at a few simple wok dishes. It was a fun (and tasty!) way to get to know each other in a different context :)

Spicy, salty, crunchy and simply awesome!

Ingredients:
Green Beans
Ground Pork
Minced Garlic
Minced Ginger
Pepper Powder
Sugar
Salt
Light Soy Sauce
Dark Soy Sauce
Dried Red Peppers
Vegetable Oil (A LOT of it!!)

So the first big surprise (aka shouldn't have been such a big surprise, hello again, denial!) was that the green beans, once washed and chopped, are actually deep-fried in oil. HA! The big secret to their deliciousness...

The wok was full of really hot oil, and the green beans were tossed right in creating a lot of very-hot-oil-splatter which we shielded ourselves from by holding a metal mesh over the top of the wok.

ASIDE:
(I am not sure how I feel about this deep-frying... it is delicious and I have heard that when something gets deep-fried for a short amount of time in really hot oil it's not actually that bad for you, because it ends up not absorbing so much of the oil... (denial again?!) But still, Chef Mike said we could boil or steam the green beans instead but then guaranteed the flavor and texture would not be the same, aka not as delicious!)

The green beans were in the oil for about 30-40 seconds before being removed and drained. Then the wok went right back on the hot burner with just a bit of oil and we added, in rapid succession:
minced garlic
minced ginger
ground pork
pepper powder
dried red pepper
about 1/2 teaspoon of salt
1/2 teaspoon of sugar
2 teaspoons light soy sauce
1 teaspoon dark soy sauce

This creates a burning smoke that will cause sneezes and tears in anyone around you but somehow, due to the miracles of air circulation around the actual wok, never actually hurt the cook! (I suggest clearing the kitchen of children, pets and other loved ones for this!)

((I was surprised Mike didn't use the Sichuan peppercorns in his recipe; I will definitely toss some in when I try this at home. I just love their numbing pepperiness!))

Once the pork was almost cooked through, the green beans were tossed back into the wok to pick up all the flavors.

It was ABSOLUTELY delicious. Salty, spicy, lovely color and great texture! Hmmm!


Monday, August 27, 2012

The (Almost) Completely Homemade Tomato Sauce

Growing up in an Italian family, I was spoiled with fresh pastas and delicious, homemade sauce. I am a picky eater of Italian food and yet I do so love it, and love to make it at home. Pasta for me is often a spur of the moment comfort food, and I need to be able to have it when I want it! And I simply cannot STAND anything from a jar or can coming anywhere near my pasta... or almost nothing!

Making tomato sauce from scratch, while not rocket science, is somewhat time-consuming and really only worth doing in large batches. Growing up we would usually make about 5 litres at a time and freeze it, but I am currently somewhat limited by my small Chinese refrigerator. While I do definitely plan to make use of these delicious summer tomatos to make a batch soon, I also thought I would share a trick my Italian family often used when we were out of our homemade kind: Pomodori Pelati

The secret to having homemade tomato sauce in a snap!
Pomodori Pelati translates literally to "naked tomatoes" and it's just what Italians call whole, peeled, canned tomatoes. Except it sounds so much cooler in Italian. With a can of these, you can have the deliciousness of homemade tomato sauce in just 15 minutes, I promise!

But first things first. Even if you can't buy an Italian brand, which is perfectly fine, make sure you are getting the right thing. They should be whole, peeled tomatoes. Not crushed. Not diced. Not anything else! They should be canned in their own juice. There should be NO OTHER INGREDIENTS except for citric acid, which they need to put in to can them. Check the ingredients list! Mine says

"INGREDIENTS: peeled tomatoes, tomato juice, acidity regulator: citric acid"

Ok, so if you have the right stuff, your tomato sauce will be delicious!

Here is what you need to do:
Open the can and pour the contents into a saucepan. You can rinse the can out with some water to get the extra juice out, and add that to the saucepan too!
Turn the burner on medium and, as the sauce begins to warm up, use a wooden spoon to crush the whole tomatoes against the sides of the pot. You can have the sauce be as chunky or homogenous as you like it, depending on how long you do this for!
Add a pinch of salt.
Add a spoonful of sugar or honey (this helps to break the bitterness/acidity of the tomatoes and is the secret ingredient in many Italian family recipes!
Add a couple of dried bay leaves, whole.
Add a couple whole, peeled cloves of garlic.
OPTIONAL:
Add a dash of pepper (black, white, red, whichever you prefer!)
Add a couple of fresh basil leaves.

Let the sauce simmer until you have the desired consistency. If you are making pasta, 10-15 minutes should be plenty. If you want to use the sauce for lasagna or pizza and need it to be thicker, let it simmer longer.

I sometimes make extra and freeze or refrigerate this kind of sauce for later too.

Notice no oils or fat of any kind are added! This is important since the heating process changes fats, altering their flavor and making them less healthy. In my family, we only add the fats/oils once the pasta is ready to be served, i.e. AFTER the sauce has been poured over the hot pasta! Once this happens, you can add a spoonful of butter and/or a drizzle of olive oil to the pasta and sauce together. The pasta will be hot enough for the butter to melt and it makes the sauce SO rich and creamy! And olive oil is just delicious and healthy and Italians add it to pretty much everything.

Enjoy!


Saturday, August 25, 2012

Cool as a Cucumber Salad!

This salad is an adaptation of a recipe I saw on the NYTimes and it is a deliciously refreshing, easy and tasty dish that can be eaten alone or used as a side. It keeps for 3-5 days in the fridge, so I often make extra so I can keep munching on it for a few days. It makes for a wonderfully cooling lunch eaten on pita bread :)


Fresh freshness, radishes credit of Avocado Lady ;)


Ingredients:
Cucumber
Radish (turnip works too, if you can't find radishes!)
Plain yoghurt
Garlic
Salt to taste

Optional:
Red Pepper Flakes
Mint

I used 2 medium cucumbers and 3 radishes, but you can alter the proportions of the ingredients to suit you and make tons more of the recipe if you want to keep it for a few days.

I cut the cucumbers lengthwise twice, and then slice them up so it's as if each slice is quartered and the cucumbers are little cubes. The radishes I just slice.

Add one clove of garlic, crushed through the garlic press (or more, to taste, but I feel like one fat clove already gives this plenty of kick!) and salt to taste. This time I also chopped my recently harvested, fresh mint leaves and added them in, mixing in two big spoonfuls of my homemade plain yoghurt. I added a bit of red pepper flakes, for extra kick, and it offsets the refreshing flavors of cucumber, mint and yoghurt pretty well!

Once the salad is allowed to sit for a while, the cucumber releases some water and there is some separation of the yoghurt. This is normal, so just mix it up before you eat and you are good to go!

This salad rocks my summer!

Tuesday, August 21, 2012

Fancy a Rugula?

I have been getting home really late. Mostly it's because I have been going to Yoga class in the evenings, and by the time I bike home, sweaty and exhausted, I am really not up for much cooking or much heavy eating for that matter.

Getting creative with salads can help, since they make for light, healthy and quick late-night meals!

Spicy arugula, creamy mozarrella, flavourful tomatoes and the crunch of walnuts! Yum!

The ingredients for this salad included arugula, fresh mozzarella cheese, sundried tomatos and walnuts! These ingredients go so well together, and the gourmet feel of the salad makes the meal and indulgence even though it's very light.

I seasoned mine with salt, ground black pepper, balsamic vinegar and olive oil. Yum!

Quick Sandwich!

Feeling uninspired to prepare a real lunch, I decided to go with a quick sandwich!

Sorry, I totally forgot to take a picture until after I bit into it!

I mixed some of the pesto I had made with a generous spoonful of plain yoghurt and got a delicious spread I used to flavor the bread.

The bread is a new experiment of sorts, bought at a new bakery I decided to try (more on this in a future post!) and it wasn't quite as delicious as the German bread I usually buy at City Shop... oh well!

It was a simple affair, lettuce, tomato, and cheese. A light, simple lunch!


Monday, August 20, 2012

Basil, Pestle, Pesto Presto!

The little bit of basil I harvested the other day turned into a little bit of pesto! I used a mortar and pestle, which I don't usually do for larger quantities because it is too laborious, but I was weighing the relative advantage of doing a little more work to squish the basil vs. having to clean my food processor just because of a tiny bit of pesto... Well, I am a reluctant cook after all!

First you smash it, you smash it!

To make the pesto I added a bit of salt and one clove of garlic, crushed through the press. Then I drizzled olive oil ad added a bit of black pepper.

Since everything was done in minimal quantities, this turned out to be a very intense little bit of pesto, super concentrated and perfect for spicing up any dish or sandwich :)


Sunday, August 19, 2012

Crunchy Granola -- Breakfast of Champs!

I always eat breakfast. Without it, I am a grumpy shell of a person. Yet lately, I've been feeling really uninspired to eat in the mornings... Maybe it's the heat but once I start brewing my coffee, there seems to be nothing I want to have with it.

She said she was Grano-lah!


Eggs? Meh. Toast? Hmm... meh. Too hot for oatmeal. And the cereal has been getting old. And suddenly I realized I was craving granola!

Sweet, crunchy granola over yoghurt and fruit!

So, I made some!

This is what I used today:

  • 4 cups of oats
  • 1/2 cup almonds, coarsely chopped
  • 1/2 cup raisins
  • 1/2 cup brown sugar
  • 1/2 cup honey
  • 1/4 cup vegetable oil
  • 1/2 tbsp. vanilla extract
  • 1 dash each of cinnamon, nutmeg and ginger powder
  • 1 pinch of salt


  1. I preheated the oven to about 165 degrees Celsius (around 250 degrees Fahrenheit) and mixed all the ingredients except for the raisins in a large mixing bowl.
  2. I spread everything evenly onto a large baking sheet; it was about 1/2 inch thick.
  3. I baked for approximately 25 minutes, mixing the granola every 10min or so, so it would brown evenly.
  4. I usually add the raisins in for the last 10 or so min, but I totally forgot! So I just added them to the hot granola when I removed it from the oven and it's fine :)
  5. The granola is ready when it's a nice golden brown!
  6. I get the granola off the baking sheet while it's still hot, so that none of it sticks! I find this much better than letting it cool on the baking sheet and then having to scrape it off later. It also avoids the use of aluminum foil or parchment paper, which I find totally annoying and unnecessary. You can let the granola cool in the mixing bowl before you transfer it to an air-tight container for storage.


Making granola is easy easy and you can pretty much put anything in it that you want, as long as, when you stick it in the oven, the mixture is moist and evenly coated. Different nuts, such as pecans, walnuts or cashews do well; different (fancy!) oils like almond or walnut or coconut oil add delicious flavor; applesauce and other fruit purees can substitute for part of or all of the oil; other dried fruits such as cranberries, dried apricots, coconut, etc. can also be used instead of raisins. And of course you can also use different types of grains and grain mixtures if you prefer!

Enjoy with milk or yoghurt, over fresh summer fruits!